sábado, 11 de diciembre de 2010
Sweet Potato Pie
With Thanksgiving having just passed, and the Holidays right around the corner, I thought I'd blog my sweet potato pie recipe. The origin of this recipe is my mom. What's great about cooking is that you can take someone's recipe, tweak it and make it your own! But this is definitely my mother's Sweet Potato Pie recipe!
Ingredients:
-Pre-made or homemade pie dough
-Dried beans or chick peas
-4-5 eggs
-2 sweet potatoes
-molasses
-1/2 tbsp. ginger powder
-1/2 tsp. nutmeg
-1 tbsp. cinnamon
-1 tbsp. vanilla
-1 1/2 cans of evaporate milk or heavy cream
Stick the sweet potatoes in the microwave until done, you can test this by sticking a fork into the potato. If it goes in easily, it's done. If you haven't got a microwave, peel and boil the sweet potatoes until done. In a blender or food processor mix the eggs, add the evaporated milk/heavy cream, peeled sweet potatoes, 3-4 spoons of sugar which is optional depending on how sweet you want it and 4-6 tbsps. of molasses depending on how sweet you want it, you can try the batter and adjust accordingly (side note* my brother and I used to love the sweet potato pie mixture so much that we'd joke about just drinking it and sometimes my mother had to separate us from the batter to have the pie actually make it to the oven). While mixing these ingredients, you should put the bean filled pie crust in the pre-heated oven at 175 C/345 F for 10 minutes. Remove the beans when done and save them, they are still perfectly fine for later use! When the pie mixture is fully blended and tastes good, pour it into the pie crust and stick it in the oven for about 45 minutes, or until you can stick a toothpick in it and it comes out clean. Allow the pie to cool before putting it in the fridge. Cool it in the fridge for several hours before serving.
Serve with vanilla ice cream or whipped cream. It's delicious and nutritious and a family fav!
Enjoy and HAPPY HOLIDAYS!!!!
miércoles, 24 de noviembre de 2010
Coming Soon...
SWEET POTATO PIE!!!!!!
I hope that your preparations for Thanksgiving are going well. I wish you safe travels and regardless of if you are with people or not, a day of reflection on the greatness in your lives and this is what you should indeed be thankful for. I am thankful for your following!
Happy Thanksgiving!
domingo, 14 de noviembre de 2010
Smoked Salmon Surprise Pockets
What do you do when you have some empanada dough leftover and you just don't know what to do with it? Make a Surprise Pocket! Okay, I'll admit it, I had no idea what I was going to do with the leftover dough I had in the fridge, but what is cooking, but experimenting in the kitchen? Sometimes you end up with a great invention like these, Smoked Salmon Surprise Pockets!
Ingredients:
-100g Smoked Salmon (OR sliced sandwich ham/turkey)
-4 tbsp. fine cheese for pasta
-1/2 stick butter
-3/4 cup of milk
-3-4 onions
-1 egg
-3-4 spoons of brown sugar
-1/4 cup of vinegar
-olive oil
-pre-made dough
-pinch of all spice
-salt
This is such an easy recipe! The hardest part is caramelizing the onions. To caramelize the onions, cut an onion julienne. Pour abundant olive oil in a pan, add the onions and saute on low heat for about 20 minutes, stirring occasionally, or until the juice in the onions evaporate. Add 3-4 spoons of sugar and stir. Continue sauteing on low until the sugar caramelizes. Add 1/4 cup of vinegar and continue sauteing and stirring until the vinegar evaporates. Once the onions are greatly reduced and take on a brown colour, refer to the picture if you aren't sure how they should look, they are done.
Next, prepare the bechamel sauce. First melt the butter in a pan, add the flour and saute for a few minutes to cook the flour. Add the milk little by little whisking. You don't want to add it all at once because you want to get the right consistency. So add a little milk, whisk and if it's too thick, add more milk. Continue whisking and adding milk until you get the thickness that you want. Then add a pint of salt and all spice, mix it in and set the bechamel to the side to cool a bit.
Preheat the oven on high. Now you are ready to set up the Surprise Pockets. Place the dough on a plate, add a spoon of cooled bechamel to the center of the dough, spread out leaving some room around the edges so it's easy to fold the pockets later. Next, add some previously cut up smoked salmon (or sandwich meat. I actually ran out of smoked salmon so made the last 3 with slice ham and my husband couldn't decide which he preferred!), and then top with some caramelized onions. There are various ways that you can fold the dough to make the pockets. Brush egg around the outside and either fold all the sides into the center,trying to overlap the ends so that they seal. You can also bring two ends together and then the fold last end to the center to make a triangular pocket. Experiment. It doesn't really matter how you fold these because it'll taste the same!
Place the finished pockets on a tray that is lined with parchment paper. Brush the pockets with egg yolk so that they shine when done and place the tray in the pre-heated oven, turning the temperature down to around 180C/350F. Bake for about 10-15 minutes, or until the pockets look brown. Midway through the baking process you can open up the oven and brush one more layer of egg yolk for extra shine!
When done place on a pretty plate and serve! You can eat these on their own or with a side salad or vegetable.
Enjoy and have fun in the kitchen. It's the biggest party place in my house!
martes, 2 de noviembre de 2010
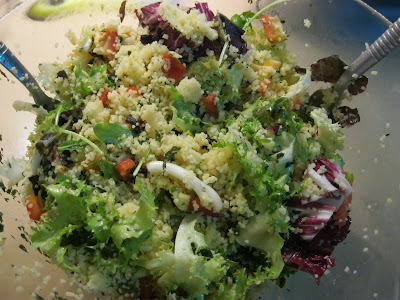
Cous Cous Salad
Cous Cous is semolina (wheat), although different grains can be used to produce it depending on the region. It is a very quick and easy to prepare and versatile. I used to experiment eating it with curry dishes, but then one day I tried my friend Andi's amazing cous cous salad and HAD to get her recipe! She said easy, replace water with orange juice and/or stock. It makes such a difference in the flavor! Try it!
What you'll need:
-a box of cous cous
-equal parts orange juice as cous cous
-a red pepper
-mint or spearmint
-a bag of mixed greens
-6 sun dried tomatoes
-a handful of pistachios
-a half an apple
-a lemon
-a spoon of curry powder
-olive oil
-salt
First, cut up the peppers, apple and sun dried tomatoes and put in a bowl. Squeeze a lemon and add the juice to the bowl and mix. Let sit.
In the meantime, mash the pistachios in a mortar and press. Wash two handfuls of mint/spearmint and dice up finely.
In a pan bring the OJ* (orange juice) with a spoon full of curry powder and salt to a boil. Shut off the heat and pour in equal parts cous cous and cover for 5 minutes.
After 5 minutes, open the lid and break up the cous cous with a fork, pouring some olive oil or butter on top. Allow to cool to room temperature. In the meantime, put your mixed greens in a bowl, add the apples, sun dried tomatoes and red pepper mixture. When the cous cous is cooled, add it to the greens and add the pistachios and mint/spearmint and mix. Dress with olive oil and if need be vinegar for added flavor.
*Note, you can use lemonade, vegetable/meat/fish stock, or even water to make cous cous. Just remember, whatever you use, is how the cous cous will taste. Also, don't forget to use the same amount of cous cous as liquid. So if you are making 2 cups of cous cous, you need to bring 2 cups of liquid to a boil.
Serve and enjoy!
sábado, 9 de octubre de 2010
Coconut Curry Chicken with Chinese Noodles
Curry powder is a great spice (actually it's a mix of many spices) to use in countless ways in cooking. You can put it in the flour that you fry your chicken, fish, or vegetables in. You can add a spoon of it to mayonnaise to give your sandwich a nice kick, or to your olive oil for your salad. And of course, you can add it to your sauteed vegetables to have along or add with whichever fish or meat you use to make a yummy curry dish. This recipe is for a light curry. It isn't too strong because some Spaniards don't like their food too spicy. But, my guests seemed to really enjoy it so here it is.
Ingredients:
-1 pound of boneless chicken breast
-1-2 onions
-2-3 green peppers
-5 mushrooms
-4-6 pieces of garlic
-1 1/2 cans of coconut milk
-1/2 tbsp. turmeric
-1 tsp. of coriander
-1/4 tbsp. of smoky Turkish pepper
-1 tbsp. curry powder
-1 tbsp. HOT Indian Curry Powder (add more if you like it spicier!)
-1 tsp. of Garam Masala
-1/2 tbsp. cinnamon
-1 tsp. of salt
First wash the chicken breast under cold water with vinegar and salt. Then, cut it up in cubes, discarding the fatty pieces. Place the chicken in a bowl and add the the powdered spices, salt and minced garlic and let it sit in the fridge for several hours. Saute the sliced onions, mushrooms and peppers sprinkled in salt on medium heat for 10 minutes. Add the chicken and saute for 5 more minutes. Then add the coconut milk and cover on low heat for another 5 minutes. Uncover, and stir. Continue cooking uncovered on low until the chicken is white through and through.
Serve over Chinese rice noodles, being careful to not use too many noodles or your food will have no flavor.
This is a VERY easy recipe that you can vary depending on what you have in the fridge. You can omit the chicken if you are vegetarian and use more mushrooms. If you are a meat eater use beef or pork, and if you prefer fish use a light fish like hake (Merluza). You can use more curry powder if you like it spicier, and delete the coconut milk and just use stock or water instead if you aren't a fan of creamy dishes. You can also use cream or yogurt instead if you don't like coconut.
Remember that the sky is the limit and keep cooking! Enjoy!
jueves, 23 de septiembre de 2010
Broccoli Leek and Four Cheese Quiche
First of all, let me just apologize for being totally disconnected from A Dish a Week blog for quite some time. You see, I just got married on August 14th and had a lot of preparation before the big day, then the honeymoon and finally returning to work and normal life. Married life is wonderful! And to honor that, I have for you today a version of my grandma's quiche.
When my grandmother taught me how to make quiche, she explained to me that it's such a simple plate to make and is guaranteed to impress guest. They'd never guess how simple it is to throw this recipe together!
Ingredients needed:
-5 eggs
-a leek
-a bunch of broccoli
-a can of evaporated milk
-250 grams of grated 4 cheese
-1 pack of pre-made dough
-1 tomato
-pepper and salt to taste
If your dough was in the freezer, make sure to leave it in the fridge overnight to thaw. Then remove it from the fridge and allow it to get to room temperature. When ready, lay the dough out, sprinkle some flour on it and the rolling pin and roll it out. This is my preference, because I really don't care for thick crust. If you like your crust thicker, then skip this step. Place the dough in the pie tin and roll up the excess sides and then pinch it going all the way around. This is just to make the quiche look pretty! Set to this aside and begin making the filling.
Beat 5 eggs in a mixing bowl. Add the evaporated milk and mix some more. Clean the leek well, as there is a lot of dirt hidden in the top layers. Cut both ends of the leek and slice nearly to the end where the roots were. Run the leek under water until all the dirt has come out. Then slice it up and add it to the mixing bowl. Open the pack of cheese and throw that in too. Wash the broccoli and cut the floral part off, breaking it into small pieces with your fingers and add. Add a pinch of salt and pepper. Stir all of these ingredients together and then pour them into the pie tin.
Slice up a tomato and decorate the top of the quiche with it. Sprinkle some salt on the tomatoes and stick the quiche in the preheated oven.
Bake at 180 C (355 F) for 30 minutes. Make sure to dip a toothpick in after the 30 minutes are up. If it comes out clear it's done. If it doesn't, bake it for a little more. Allow to sit before serving. Eat hot or at room temperature.
I hope that you enjoyed this long awaited recipe. It's super easy! You can make a quiche out of anything you want. The basic ingredients are eggs and evaporated milk. From there you can experiment with different kinds of cheese, sliced meat, vegetables, smoked fish, you name it!
Enjoy and keep having fun in the kitchen!
jueves, 8 de julio de 2010
Plantain Patties
People tend to think that making a wholesome vegetarian meal is harder than it really is. This idea came to be because my brother found green plantains on sale 10 for $1 and bought 10. There were 6 left in my father's fridge and I thought...what can I do with these...? I know, I'll make plantain patties! This was a complete invention, but I was very happy the result, and not one patty was left out of the 12-14 that were made, which is always a good sign!
Ingredients for Plantain Patties:
-6 peeled and mashed semi-green plantains
-2 eggs
-5 diced scallions
-1/2 yellow onion
-a whole head of garlic
-fresh parsley
-fresh cilantro
-1/2 cup of white flour
-a spoon of salt
-pepper
-a spoon of paprika
-vegetable oil for frying
Ingredients for Sauteed Mushrooms:
-a package of whole mushrooms
-1/2 yellow onion
-5 pieces of garlic
-salt and pepper to taste
-olive oil for cooking
How to make Plantain Patties:
Take the semi-green plantains and make a slice on the side and pop the plantain out of it's peel. If the peel doesn't come off then use a knife to slice it off. Dice the plantains up and place them in a bowl. Then use your hands to mash them up. Cut the ends off of the scallions and remove the outer layer and rinse. Dice the scallions and 1/2 onion up and add them to the plantain mixture. Crush the head of garlic using a garlic press into the bowl. Break two eggs into the mixture along with some salt, pepper and two hands of chopped parsley and cilantro. Mix the ingredients and then put the bowl in the fridge for a little while to allow the mixture to marinate.
In the meantime you can prep the mushrooms. First cut the ends off of the whole mushrooms, fill a big bowl with water and place the mushrooms in the water and push them down and allow them to rise to the surface a few times. Then pour out the water and repeat 2-3 times until clean. Try to shake the excess water off of the mushrooms. Next, cut them in quarters and put them in an oiled preheated pan. Add the 1/2 diced onion to the pan and the sliced garlic and saute on low. If you've got some white wine add 1/4 cup and allow to evaporate. Sprinkle with salt and continue sauteing until done. If the ingredients get too dry, add some water and continue sauteing until the mushrooms are done.
To finish making the Plantain Patties, remove the mixture from the fridge, pour 1/2 inch of vegetable oil into a pan and put on medium heat. A trick to see if the oil is hot is to throw a piece of garlic into the oil and if it starts to fry then you know it's ready, if it doesn't then heat the oil until the garlic starts to cook. I tried to premake the patties, but the mixture was too wet and sticky, so it's best to make them and drop them into the hot oil as you go. To do this, take a handful of the plantain mixture and form a patty shape, sprinkle some flour on each side while in your hand and drop the patty into the pan. It may seem too liquidy, but believe me, the patty will harden and stick together when fried. Allow to cook until brown and then flip. Make sure that each side is nice and brown to ensure that the patties are completely done.
As the patties are done, place them on a plate with paper towel to soak up some of the excess oil on the patty. Serve the patties with the side of sauteed mushrooms and a little salad. Feel free to eat the patty with your favorite sauce. My father ate them with hot sauce.
I hope that you enjoy this recipe and keep on keeping on in the kitchen!
domingo, 13 de junio de 2010
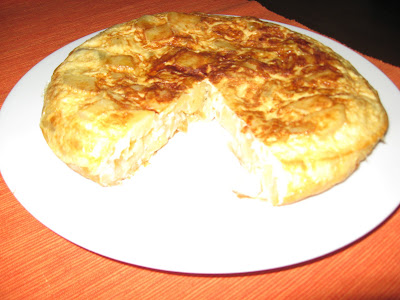
Spanish Tortilla
It has been a while since I've added a dish, I am very sorry! I will say, I have taken pictures of quite a few dishes, but in the end opted not to add them...yet...
What you need for this dish:
3 potatoes
2 onions
7 eggs
olive oil and vegetable oil
First, peel and wash the potatoes and cut them into squares. Fill a pot with vegetable oil and begin frying the potatoes. You want them to be done, but take them out before they turn brown. Next, slice the 2 onions up and saute in 2 to 3 spoons of olive oil. Continue sauteing until lightly brown and turn off. As the potatoes are done, scoop them up with a utensil with holes in it so that the oil drains a little, but not completely as the oil will help the egg not stick to the pan, put in the plate sized (or slightly smaller) pan with the already cooked onions. When the potatoes and onions are done, sprinkle some salt on them and put on low heat stirring as you beat 7 eggs. To know how much salt to use, sprinkle a little salt on each egg in the bowl prior to mixing. When mixed, evenly spread the potatoes and onions in the pan and pour the eggs on top. Leave on medium heat and let cook for about 5 minutes. Then, use a spatula and make sure that the sides of the tortilla are not stuck to the sides of the pan.
The trick* Place a large plate over the pan and flip the tortilla over after the initial 5 minutes. It'll still be only half cooked and some egg may leak out, but no worries! Slide the tortilla back into the pan and allow to cook for another 5 minutes...repeat this process two more times or until you think that the tortilla is fully cooked. Here in Spain, people like to eat it still wet in the middle, I am not a fan of this though and like to cook the tortilla through.
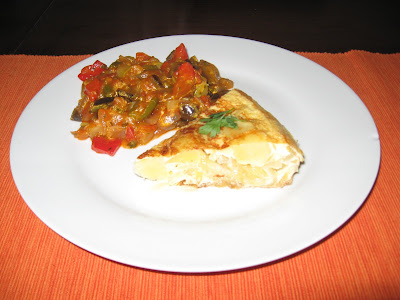
Serve with your choice of side. In the photo below I served it with Spanish pisto that I also made. Enjoy and keep cooking!!
What you need for this dish:
3 potatoes
2 onions
7 eggs
olive oil and vegetable oil
First, peel and wash the potatoes and cut them into squares. Fill a pot with vegetable oil and begin frying the potatoes. You want them to be done, but take them out before they turn brown. Next, slice the 2 onions up and saute in 2 to 3 spoons of olive oil. Continue sauteing until lightly brown and turn off. As the potatoes are done, scoop them up with a utensil with holes in it so that the oil drains a little, but not completely as the oil will help the egg not stick to the pan, put in the plate sized (or slightly smaller) pan with the already cooked onions. When the potatoes and onions are done, sprinkle some salt on them and put on low heat stirring as you beat 7 eggs. To know how much salt to use, sprinkle a little salt on each egg in the bowl prior to mixing. When mixed, evenly spread the potatoes and onions in the pan and pour the eggs on top. Leave on medium heat and let cook for about 5 minutes. Then, use a spatula and make sure that the sides of the tortilla are not stuck to the sides of the pan.
The trick* Place a large plate over the pan and flip the tortilla over after the initial 5 minutes. It'll still be only half cooked and some egg may leak out, but no worries! Slide the tortilla back into the pan and allow to cook for another 5 minutes...repeat this process two more times or until you think that the tortilla is fully cooked. Here in Spain, people like to eat it still wet in the middle, I am not a fan of this though and like to cook the tortilla through.
Serve with your choice of side. In the photo below I served it with Spanish pisto that I also made. Enjoy and keep cooking!!
domingo, 16 de mayo de 2010
Mushroom and Cheese Empanada
This recipe was created like most, by default! I had some seta mushrooms in the fridge and thought, what should I do with them? Then I had some leftover scraps of empanada dough too that had to be used soon. So I said 1+1=2 isn't it? I'll make an empanada!
Ingredients needed:
-100g of seta mushrooms
-an onion or leek
-a quarter or half of a tomato
-two tbsp. of tomato sauce or paste
-a tbsp. of olive oil
-150g of the cheese of your choice
-two tbsp. of butter
-1/3 cup of milk
-empanada dough
-four tbsp. of flour
-an egg
-salt
First rinse the seta mushrooms off and dry off with some paper kitchen towel. Slice the mushroom up in strips, dice up an onion and/or leek and cut the tomato up. Pour a spoon of olive oil in a pan and saute the lightly salted vegetables on medium heat for about 10 minutes. You don't want the vegetables to be too done, but you want them to have released their juices and have browned a bit.
When the vegetables are done, turn them off and allow them to cool for several minutes. In the meantime, make the cheese sauce! Melt the butter in a pot. Add two tbsp. of flour and whisk so that the flour cooks. Mix in the milk, adding it little by little. You want the bechamel sauce, which is what you are making, to be thick. You don't want it to be too liquidy so make sure to add the milk little by little and if it's getting too liquidy then don't add all the milk. Whisk the sauce, under a low flame. It'll thicken in a few minutes. When it seems done, add 1-2 tbsp. of tomato sauce, some salt and the grated cheese and mix. You can also add pepper or fresh herbs. There are no rules to cooking so feel free to experiment! After the cheese has melted and is mixed in well, pour the seta mushroom mixture into the cheese sauce, stir in and then allow to cool.
To prepare the dough, sprinkle flour on the kitchen top. If it's leftover empanada dough as I had, then roll it into a ball, put it on the kitchen top, flatten it out with your hand and then roll out with a floured rolling pin. Flip the dough over and roll out each side several times in order to make a square or circle. You'll have to make two of these same shapes for the empanada. Of course the easiest thing is, if you are using new frozen dough that has already been semi-rolled out and is shaped so it's easier to work with. You can see more detailed images of how to do this in previous empanada postings.
Preheat the oven on high. Place a piece of parchment paper on a large cookie pan, place the rolled out dough on top and then pour the filling on the dough. Spread it out, being careful not to break the dough. Once the filling is rolled out, place the other dough on top, and then roll the sides of the lower dough in with the sides of the upper dough layer. Brush the egg on the dough and then lightly poke holes in the top with a fork.
Lower the oven temperature to 180C/356F and place the empanada in the oven. Allow to bake for 25-35 minutes. Remove from the oven when the top has browned like in the picture below:
When done, take the empanada out of the oven and allow to cool for a few minutes and then cut and serve! Try not to burn yourself i your excitement to try this yummy treat!
Remember that you can make just about any kind of empanada. The key is to make sure that the filling isn't too liquidy and to roll the sides of the empanada up so that it doesn't open up in the oven.
Enjoy and keep enjoying the kitchen!
martes, 11 de mayo de 2010
Ginger Salmon with Shrimp
Ingredients needed to serve two people:
-2 fillets of salmon
-100g of shrimp
-fresh ginger
-2 pieces of garlic
-a medium onion
-a piece of a chili pepper
-3 spoons of soy sauce
-a spoon of honey
-3 spoons of olive oil
One of the best ingredients that you can have in the kitchen is soy sauce. It's natural, healthy, tastes delicious and whether it's mixed with sugar, honey, lemon, orange juice, ginger, garlic, chili pepper or even vinegar, it can be used in an unlimited number of ways.
To prepare this dish, slice up an onion, pour 3 tablespoons of olive oil in a medium pan and saute for 2-4 minutes. Add the finely sliced garlic and continue sauteing for another 1-2 minutes.
In the meantime, peel the ginger with a spoon. That's not a typo a spoon! Grate the piece of ginger the size of a finger and sprinkle it over the salmon.
Put the salmon in the pan and pour the soy sauce in the pan and allow to simmer for about 4-5 minutes per side. When the salmon looks nearly done, add the slice of the chili pepper being careful to have already removed the seeds if you don't want it too spicy. Add the peeled shrimp and tablespoon of honey as well. Stir the shrimp and onions, being careful not to break up the salmon. If you don't know how long to cook the salmon for, five minutes on each side is a safe bet. You can also cook it less if you like it a little raw in the middle, but only do so with fresh salmon.
When done, serve with basmalti rice, rice noodles or your choice of side.
This s a very easy recipe! Remember the sky is the limit in the kitchen, so keep on exploring and enjoy!
lunes, 3 de mayo de 2010
Upside Down Apple Pie
Yesterday was Mother's Day in Spain. My future mother-in-law loves dried nuts, so I wanted to play with this idea to make her something special. This is a very easy dessert to make and guaranteed to impress! You need:
-1 apple
-1 empanada/pie dough
-several spoons of sugar
-cinnamon
-an egg
-dried nuts (pistachios/almonds/cashews)
Roll out the dough, sprinkling flour first on the surface and rubbing it on the rolling pin to prevent it from sticking. Peel and slice up the apple. Crush the nuts in a mortar and pestle. Now everything's prepared to make the upside down pie! First, melt the sugar (half a cup, depending on how sweet you want the pie to be!) in a pan on a medium flame, whisking to prevent burning. Be very careful whilst making caramel because if it gets stuck on your skin, it will cause a terrible burn! When the caramel is melted, pour it in a cake pan, which has previously been covered in parchment/vegetable paper. Next, sprinkle the nuts on the caramel. Then, lay down the slices of apple, sprinkle with cinnamon, and lastly you can cover the apples with another layer of caramel, which you'll have to make in the moment because once you remove the caramel from the flame, it gets hard. Remember, the more caramel you add, the sweeter this dessert will be. So if you don't like desserts too sweet, just add a think layer at the start and leave it at that! Finally, lay the dough over the top of the pan, pushing the sides down so that it's nearly touching the apple layer. Cut the access dough off of the border of the cake pan, roll and place in saran/plastic wrap to use at a later time. Roll down the dough around the sides so that it looks pretty. Brush with egg and stick in the oven for 20-30 minutes at 175 C/347 F. It's done when the top is brown. When done, stick another piece of parchment/vegetable paper on a plate, put the plate upside down on the cake pan and carefully flip whilst still hot, to prevent the caramel from getting hard again and making the pie stick as is to the pan. Be careful of access caramel leaking out of the sides! Eat warm or at room temperature. Enjoy and keep experimenting in the kitchen!
Suscribirse a:
Entradas (Atom)