jueves, 24 de diciembre de 2009

The Best Eggnog


Well I cannot even begin to take credit for this recipe. But I will tell about my experience using ¨The Best Eggnog¨recipe from this site:

http://www.chow.com/recipes/10758

So there I was on Sunday with an incredible craving for eggnog. Here in Seville you can't just go to the grocery store and buy a can of eggnog. If you want it, you've got to make it! I asked around, checked out some websites and finally found one a recipe that looked really good...and REALLY potent! I will say, I was skeptical with adding an ENTIRE bottle of bourbon, not to mention I don't even drink bourbon! But that along with the half a cup of rum and half a cup of expenive cognac, tasted great! I am sure that my fiance wasn't that pleased about my stealing the good stuff from his stash. But once he tries it tonight at the family Christmas Eve dinner, I am sure he'll ask when I'll be making it again.

On a side note, I added some vanilla and a lot of cinnamon. I didn't have fresh nutmeg and don't care for the store bought ground stuff, so I just added a pinch of it.

So as you can see in the first picture, I started by separating the yolks and whites.

Next I whisked the yolk until creamy and added the sugar.


And finally you can see that all of the ingredients have been mixed together: the yolks and the sugar, the rum, cognac and full bottle of bourbon and the 4 cups of milk and cinnamon and vanilla.


To serve, I beat some egg whites with heavy cream until light and fluffy and then folded them into the egg nog mixture. As you can see, it's nice to sprinkle some cinnamon or nutmeg ontop and serve on ice.

We'll see how it goes tonight at the Christmas Eve dinner, but I will say, I served this to my colleagues on Tuesday and it was a hit and they were begging for more!

Enjoy and a very Merry and Safe Christmas to you all!

martes, 22 de diciembre de 2009

Pastaless Lasagna

This recipe was invented as most do, by accident some time last year. I wanted lasagna and didn't have any pasta. So I decided to go about it, replacing the layers with layers of grilled veggies and loved it perhaps even more than the real stuff! This is just one of my many variations of Pastaless Lasagna.

First, slice the zucchini and eggplant. Soak the eggplant in water and salt and allow to soak for at least 20 minutes and up to several hours. This gets the bitterness out of the eggplant. Next, pour some olive oil in the pan and sprinkle with coarse salt and grill the zucchini and eggplant.

If you have some leftover tomato sauce, as I did, then put a layer of it on the bottom. If you don't then just use some fresh slices of tomato. After the tomato sauce, put a layer of the grilled zucchini.


After the layer to tomato sauce and zucchini, add a layer of grilled eggplant.

And then a layer of fresh sliced tomato with fresh or if you don't have fresh dried herbs on top. I sprinkled basil, oregano, parsley and salt.
Continue these layers until you can't fit anymore or have run out of ingredients. Top the lasagna with one last layer of tomato or tomato sauce and then grated cheese.
Stick it in the oven at 200 C for about 40 minutes.
Enjoy!

*Note, this would be very good adding ricotta cheese (or ground meat) into the layers...if you do this it's best to mix an egg with the ricotta cheese!*
Align Center

jueves, 17 de diciembre de 2009

Coming soon...

Bacalao con Tomate (Cod Fish in Tomato) and Pastaless Lasagna. Stay tuned...

jueves, 3 de diciembre de 2009

The Long Awaited "Special" Banana Bread Recipe


I know that Thanksgiving at this point was one week ago, and I'm sure that everyone, like me, had leftovers. Some were easier to dispose of than others. I got stuck with 4 large egg whites from making holandaise sauce. I absolutely HATE throwing away food. In fact, I feel that it's sacrilegious! So there I was on Sunday morning trying to figure out what the heck to do with my container of egg whites? I searched the internet but didn't like any of the options. I didn't feel like making macaroons, didn't want an egg white omelette and certainly didn't want to make lemon meringue pie. So I decided I'd experiment because cooking is like a science project, isn't it? I had 2 frozen very ripe bananas in the freezer and a ripe banana in a bowl. So I looked up a recipe for Banana Bread and these are the ingredients I got:

Ingredients

  • 3 or 4 ripe bananas, smashed
  • 1/3 cup melted butter
  • 1 cup sugar (can easily reduce to 3/4 cup)
  • 1 egg, beaten
  • 1 teaspoon vanilla
  • 1 teaspoon baking soda
  • Pinch of salt
  • 1 1/2 cups of all-purpose flour

I am not one to follow the instructions or measurements religiously while cooking, so I smashed up the bananas, and added one whole egg, sugar, butter, salt, baking soda, vanilla, pinch of salt and mixed it all. Then I addedthe flour (using half whole wheat flour and half white flour), measuring everything by eye. Separately, I threw the egg whites in the mixer, and mixed them until they were white and thick. After combining all of the ingredients, I scooped in the egg white and then did what I've seen done many times on the TV. I folded* the egg whites into the banana bread mixture. I then poured this mixture into a bread baking dish, with a piece of parchment paper covering it so that the mixture wouldn't stick. And I stuck it in the preheated oven at 350· F (170· C) for about 30 minutes.

* fold in, Cookery. to mix in or add (an ingredient) by gently turning one part over another: Fold in the egg whites.

As you can see in the pictures, it came out nice and fluffy and has been a wonderful breakfast all week long! Side note, and I learned this from my sister, to heat up bread without ruining it, dampen a piece of kitchen towel and cover the bread with the damp paper. Be careful not to overheat it or it'll ruin the bread! Just heat it for about 20-30 seconds depending on the potency of your microwave!


I hope that you enjoyed this recipe. And remember, never throw out food! There is always something that you can do with leftovers. And as a last resort when you don't know to do with something, just freeze it until you get a great idea! Good luck!

lunes, 30 de noviembre de 2009

Coming Soon....

Banana Bread with a special ingredient...

sábado, 28 de noviembre de 2009

Julie&Julia HIGHLY recommended to ALL Food Lovers!


If you have checked out my blog, then you are probably like me a true Food Lover! I just came back from seeing Julie&Julia and let me just tell you, I could relate to SO MUCH of the movie! And I could relate to both characters: Julie and Julia. I wanted to go home and just start cooking up a storm, until I realized that my fiance is away this week and I can't very well cook up a storm for myself! Haha! I'll most definitely have some friends over this week and blog about what I make! Do yourself a favor though if you haven't already, and go see this film! It'll bring tears to your eyes, make you hungry, give you some clarity to your food obsession and brighten up your day!

miércoles, 25 de noviembre de 2009

Sometimes Failed Recipes are a Success!

It all started with a great idea, how about making mushroom, roasted pepper, cheese croquetas? I sauteed the mushrooms and the roasted peppers with onions separately. When the onion/roasted pepper mixture was nearly donel I added garlic and sauteed for a few more minutes.
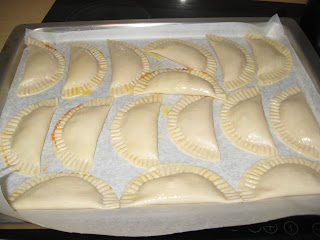
Then I made bechamel by melting butter, sauteing a good amount of flour, and adding milk, mixing constantly until it thickened on a low flame. Then I added the roasted vegetables and blended with a hand mixer and added 125 grams of grated cheese. Then I poured the mixture into a dish and allowed it to cool.Normally once the croqueta mixture is cooled you can shape them with your hands like clay and then cover them in flour, dip them in egg and cover them with bread crumbs and fry them. However, I had a problem! The croqueta mixture didn't thicken enough! I know now in retrospect it's because I didn't add enough flour to the bechamel. The filling was way too delicious to waste so I tried to think, what can I do with it? Then it hit me EMPANADAS!

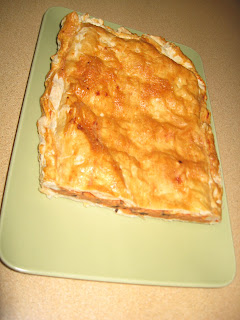
You can find empanada dough frozen in the grocery store. You can either buy mini-empanada dough which is called empanadillas, or regular empanada dough. Regardless of which you use, the way of making empanadas is nearly the same. With empanadillas you add the filling, paint raw egg around the borders, fold over and close pressing around the edges with a fork as you can see above. With a regular empanada you roll out the dough, fill it, cover it with another sheet of dough of the same or slightly smaller size, and roll up the edges. Then you poke a few holes in the top with a knife or a fork so that the empanada won't fill with air and blow up in size. With both, you finish by painting the outside with raw egg. This will make the empanada glossy. Stick the empanada in the oven and bake until brown. With the small ones you can flip them over halfway through and paint the other side with egg.
Here is the finished and cut large empanada.

Conclusion: if you have an idea and try to make something and it doesn't go well, use your imagination and think of what else you can do with it! You hardly ever need to throw out the food midway in a recipe due to it going badly. There is always something you can do with it! These "croquetas" EHM empanadas came out great! Enjoy!

domingo, 22 de noviembre de 2009

Calamares en su Tinta (Calamars in it's Ink)


This is a popular dish here in Spain. It looks like it'd be difficult to make, but really it's not! Sautee onions, red and green peppers on a low flame for like 15 minutes. Add some white wine and the calamar ink (here is Spain they sell it frozen in the fish section, ask your local fish market). Blend the ingredients with a hand blender. Then add the calamars and cover. I cook this in a pressure cooker for 8 minutes. Be careful no to over cook the calamars! Enjoy over rice!

A Variation of the Last Dish


A variation of the last dish, would be to make sweet potatoes in stead of mashed potatoes. The first time that I made this dish I actually did it with sliced sweet potatoes sauteed in garlic and soy sauce. I am a huge sweet potato fan so I would highly suggest trying this variation!

Garlic Ginger Salmon with Garlic Green Beans and Real Mashed Potatoes


Two weeks ago I made this. The fun thing about salmon is that it can be made in so many ways. In that respect it's like meat! You just have to be careful not to overcook it! This particular night I was having a girlfriend over and wanted to make something different than what she's used to. So I sauteed heaps of garlic and some onion with some soy sauce and green beans. Boiled some potatoes and mashed them up with butter, milk, a dash of seasame oil, and sauteed onions and garlic. And I grated some ginger up to marinate the salmon with soy sauce and garlic. Later I cooked these ingredients, adding the finishing touches of fresh parsley. As a side note, the trick of peeling ginger is with a spoon! Try it, the skin comes off so easily! And, remember that the later you add the ginger, the stronger it will be. Try this dish it's super easy, delicious and guaranteed to impress your guests!

Mushroom Risotto


I made Mushroom Risotto last week. It was really an experiment. And I have to say, I LOVED IT!!! It was the simplest dish that you could make, yet it had so much flavor! Next time I make it I'll post how to do it. In the meantime, if you haven't tried, try! Just remember, the trick is to have a good stock and to have plenty of it and add it little by little, stirring the risotto constantly as you make it. This one took 40 minutes of stirring!

Some Recent Dishes

I'll be posting some recent dishes I've made soon.

About Me


I'm an American living in Seville, Spain. I was born in Brooklyn, NY, but grew up moving every few years and had to learn how to adapt to new places and situations. I think that my love of travellings sprouted as a young age, I just didn't know it yet! I got my first real taste of the world when I was 20 and left the University of Miami, FL to study abroad at the University of Wollogong in Wollogong, Australia. Whilst there, I visited most of the east coast of Australia, hiked for 5 days in Tasmania and spent my 21st birthday in New Zealand. It was an amazing experience and the start of many other journies. Upon returning from Australia, I decided that I needed to see more and signed up for a month long intensive English course in Seville, Spain. Being half puertorican I've always felt the need to speak Spanish. Falling in love with both the city and a special man, I stayed in Seville and have been living in Seville ever since March of 2004 and now am fluent in Spanish too! Throughout my years of travelling and living abroad there has been one great passion: FOOD. I hope to share my love of food here by posting pictures and blogging about what I make. Buen provecho! Enjoy!